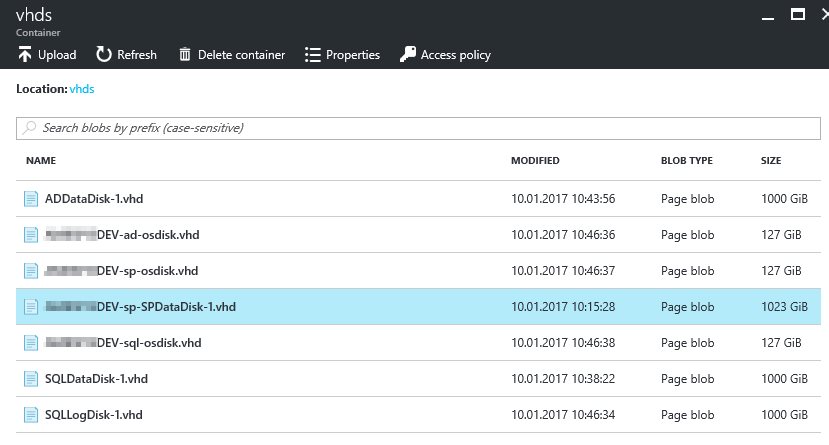
When we deployed a SharePoint 2013 non-HA Farm from the Azure Marketplace we noticed that a lot of additional storage space was added to our resource group. All three servers (Active Directory, SQL, SharePoint 2013) got at least one additional VHD blob with each 1000 GiB of SSD space that was attached to the specified server. Even when you shut down the virtual machines Microsoft Azure will still debit your subscription with the costs of those additional storage (which is not quite cheap).
This article explains how to remove the additional SSD storage to save Azure credit and to keep the SharePoint 2013 farm running and performant.

Select the desired virtual machine, go to Disks in the navigation pane and select the additional data disk. Detach the disc. After that the lease state of the blob is changed to “available” and you can finally delete the blob from the storage container.
You can repeat this for all virtual machines. But regarding the SQL server and the Active Directory server we have to ensure some additional steps before deleting the blobs.

SQL server
Go to the Server Properties via the Microsoft SQL Server Management Studio. Select Database Settings and edit the Database default locations as you desire. The best practice recommendations are available on MSDN. Before restarting the SQL server make sure to shut down the SharePoint server to avoid unwanted side effects.
After that you follow the instructions of the MSDN to move the SharePoint databases and log files. Don’t forget to configure the file permissions for the database engine.
When you finished the operations your database file locations should look like this.

Now start the SharePoint 2013 machine and validate if the system is working as expected. When everything is fine you can repeat the steps to remove and delete the attached VHD blob of the SQL virtual machine like we did with the SharePoint server.
Active Directory server
To remove the drive from the Active Directory server we have to relocate the AD database files (NTDS) and the SYSVOL directory of the Active Directory Domain Services.
The relocation of the database files is quite forward and is explained in this MSDN article. To relocate the SYSVOL directory is more complicated because the MSDN instructions are not fully correct. Execute the following instructions where are some commented by me.
- Identify Replication Partners
- This is optional because the Azure template doesn’t use any replication mechanism
- Check the Status of the SYSVOL and Netlogon Shares
- Verify Active Directory Replication
- Gather the SYSVOL Path Information
- Stop the DFS Replication Service and Netlogon Service
- Change the SYSVOL Netlogon Parameters
- Copy SYSVOL to a New Location
- Create the SYSVOL Root and Staging Areas Junction Point
- Change the SYSVOL Root Path or Staging Areas Path, or Both
- First of all you need to download the “ADSI Edit” MMC tool. It seems that this tool is not installed with the “Active Directory Domain Services” server role. You can download it here. Just extract the DLL from the CAB archive and register it with regsrv32.
Further more you have to start the DFS Replication Service and the Netlogon Server. Otherwise you can’t use the ADSI Edit tool. In my opinion that’s a mistake in the MSDN manual. So you also have to set the registry value to the original value (Change the SYSVOL Netlogon Parameters).
When you completed the instructions by using the ADSI Edit tool you can stop the services, edit the registry value and start the services again. This should work out.
- First of all you need to download the “ADSI Edit” MMC tool. It seems that this tool is not installed with the “Active Directory Domain Services” server role. You can download it here. Just extract the DLL from the CAB archive and register it with regsrv32.
- Reapply Default SYSVOL Security Settings
- When you followed the step Copy SYSVOL to a New Location you can skip this point.
- Start the DFS Replication Service and Netlogon Service
- In my case this point is obsolete because the services are already started at this point.
- Verify SYSVOL is shared in the new location
- Make sure to set SysvolReady to 1 and not to 0 like it is mentioned in the article. Eventually you have to restart the services.
- Make sure to set SysvolReady to 1 and not to 0 like it is mentioned in the article. Eventually you have to restart the services.
- Force Replication Between Domain Controllers
- Optional.

If you have any further questions or need help then don’t hesitate to contact me 🙂
